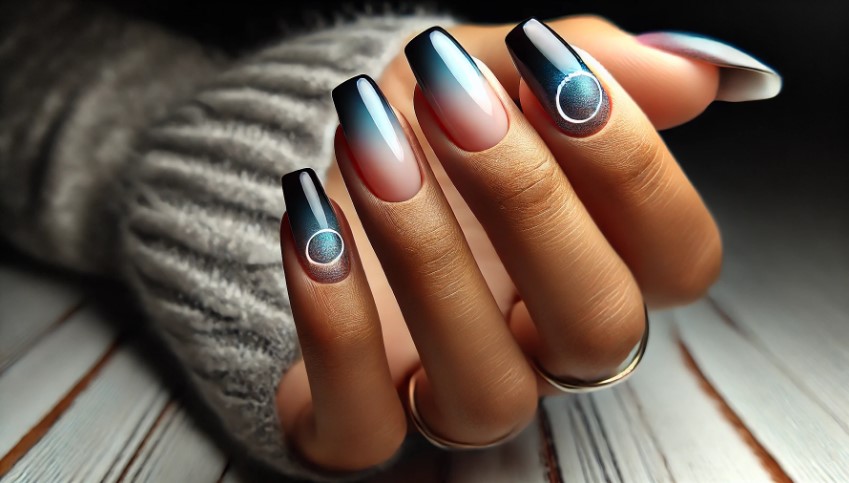
Halo nails are the latest trend that has taken the world of nail art by storm. This style is not just a simple manicure; it adds a touch of magic and elegance to your nails. Halo nails are known for their unique design, which features a glowing or “halo” effect around the nail. The effect is usually created using a shiny, iridescent finish. It can make your nails look like they are glowing with a soft, radiant light.
In this article, we’ll explain everything you need to know about halo nails. We’ll talk about what they are, how to create them, and how you can style them. Whether you are new to this trend or looking for fresh ideas, we’ve got you covered.
What Are Halo Nails?
Halo nails are a type of manicure where a glowing, shimmering outline or aura is created around the nail. This halo effect can make your nails look like they are glowing from the inside. The halo is typically created using a combination of nail polish colors, glitter, and shiny top coats. The glow around the nail is subtle but beautiful, giving it a mystical look.
The look can be achieved in different ways. Some people prefer a simple one-color design with a halo effect, while others like to add more colors and designs to their nails. The glowing effect can be created using gel polish, regular nail polish, or even nail stickers.
How to Create Halo Nails
Creating halo nails can be done in a few simple steps. Below is a step-by-step guide that you can follow to achieve this stunning look.
Step 1: Prepare Your Nails
Before you start painting, it’s important to clean and shape your nails. Eliminate any old nail clean and trim your nails to your ideal length. Then, use a nail file to shape them. Push back your cuticles gently to make the nails look neat.
Step 2: Apply a Base Coat
To safeguard your nails, apply an unmistakable base coat. This helps the nail polish stick better and prevents any stains from the polish.
Step 3: Choose the Main Color
The first step in creating halo nails is choosing your main nail color. The color you pick will set the tone for the design. Light shades like soft pinks, nude, or pale lavender are popular choices. However, darker colors such as black, navy blue, or deep purple can make the halo effect stand out more.
Apply two thin layers of your main nail color. Allow each layer to dry totally prior to continuing on toward the following one.
Step 4: Create the Halo Effect
Now comes the fun part! The halo effect can be created using several techniques. Here are a couple of popular ways to do it:
- Using a Halo Powder: You can buy special halo powders that create a glowing effect when applied over your nail color. To use this, apply a thin layer of clear gel polish over the dry nail color. Then, while the gel is still tacky, apply the halo powder with a small brush. The powder will create a glowing aura around the nail.
- Using Metallic or Glitter Polish: If you don’t have halo powder, you can achieve a similar effect with a metallic or glitter nail polish. Use a small brush to outline the edges of your nails with the shiny polish. The metallic or glitter polish will give a radiant glow around the nail.
Step 5: Apply a Top Coat
Once you’re happy with your halo effect, seal the design with a clear top coat. This will protect your nails and give them a shiny finish. If you’re using gel polish, you’ll need to cure your nails under a UV or LED lamp.
Step 6: Optional: Add Nail Art
For an extra touch, you can add more nail art to your halo nails. This can include small gemstones, foil designs, or even hand-painted art. You can also experiment with different halo shapes, like a full circle around the nail or just a half-ring at the tip.
Tips for the Perfect Halo Nails
Creating the perfect halo nails takes practice. Here are some tips to help you:
- Use the Right Tools: A fine nail art brush will make it easier to create clean lines for the halo effect.
- Be Patient: Let each layer of polish dry completely before applying the next one. This prevents smudging and ensures that your design stays intact.
- Experiment with Colors: While classic shades like silver and gold work great for the halo effect, you can get creative with color combinations. For example, try a pink main color with a gold halo for a chic look, or use a blue base with a silver halo for something bold.
- Care for Your Nails: Make sure to apply cuticle oil regularly to keep your nails and cuticles healthy. This will help your design last longer.
Why Choose Halo Nails?
Halo nails are a fun and creative way to show off your personality. They can suit any occasion, from casual outings to formal events. If you want something that will make your nails stand out, halo nails are a great choice.
Another reason people love halo nails is that they are versatile. You can adjust the intensity of the halo effect to suit your mood. A subtle glow is perfect for everyday wear, while a more dramatic effect is great for a night out or a special occasion.
Conclusion
Halo nails are an exciting nail art trend that offers endless possibilities. Whether you like a simple design or a more elaborate one, the glowing effect around your nails is sure to make a statement. With the right tools and a little practice, you can easily create this stunning look at home. Give it a try and watch your nails come to life with the magic of the halo effect.